A toilet flapper is a watertight rubber seal that keeps the flush valve closed, holds the water in the tank, and moves when the flush handle or button is pressed. It is an essential part of the plumbing fixture, which allows flushing water into the bowl.
How Do You Replace the Flapper in the Toilet Tank? You can replace the flapper in the toilet tank by removing water inside the tank, removing the old flapper and adding a new part, and doing a check test. Different factors, such as mineral deposits, bacteria growth, constant water dripping, use of harsh cleaners, and low flushing water, cause the replacement of this component.
The constant water dripping into the bowl or the water blockage in the tank when you press the lever to flush shows that the flapper needs a replacement.
A worn-out component causes failed performance of the plumbing fixture, and you have to face embarrassment in front of the guests.
How can you replace the flapper in the toilet tank?
You can easily change this component inside the toilet tank by following the below-mentioned steps.
Turn off the valve and remove the water
Wear rubber gloves before starting the process to avoid germs and bacteria on your hands, and turn off the water valve to stop the water supply into the tank.
Rotate the valve clockwise, and press the lever button to flush most of the water inside the tank.
Remove the lid over the tank and check the remaining water level to make sure that you can replace the component easily.
You can remove the excess water using a small bowl and pour the water into the bucket. It is better to put a rough towel or newspaper on the floor to prevent water splashes on the surface.
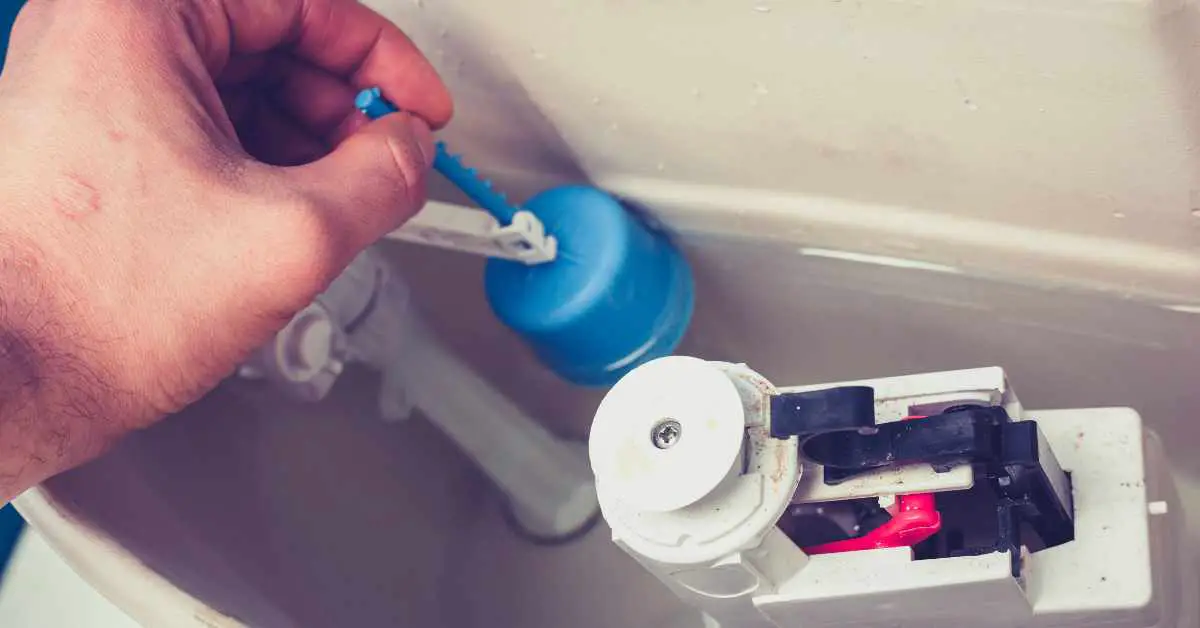
Remove the old flapper
It is fixed under the overflow tube with a chain to control the water flow into the toilet.
Remove it from the right side of the overflow tube with extended pegs to fix it and then from the left side peg of the overflow tube.
Disconnect the chain from the toilet arm, which is a long horizontal bar that connects with the flush handle and the top of the flapper.
It has a clip at the end of the bar that hooks with the small hole in the toilet arm and the flush handle.
The flapper is made of rubber, and holes on the sides to fix it in the pegs get loose over time, making it easy to remove from the overflow tube.
Check and install the new flapper
Selecting the correct part for the toilet is essential, and you can choose it by checking the gallon per flush.
This can make it easy to fix the part on the flush valve tube because it may vary for different brands of toilets.
Clean the sealing area with a sponge to remove bacteria or mold, and place the flapper over the flush valve tube.
You can adjust it for minimum and maximum flushing capacity and press down on the left side to get into the left peg and then on the right side to fix it into the seal.
Now, attach the chain to the arm and adjust the length of the chain such that it should not too tight or loose.
You can trim the excess chain with a cutter because the slack chain can get grabbed between the flapper and the flush valve.
Test the new flapper
Turn on the water supply and the valve to fill the tank and listen to the dripping or trickling, which shows the leakage or loose connection of the component.
Shut off the water supply and valve if you hear water tricking sounds, and check the seal and fix it again. Ensure the seal is properly covered and the flapper is not loose on the flush valve tube.
Turn on the water valve again and check the performance of the plumbing fixture and the water leakage around its bowl.
Why would you replace the flapper in the toilet tank?
There are many reasons for the tank components to degrade over time, and some of those reasons are explained below.
Mineral deposits
The water inside the tank is usually hard, as approximately 80% of the USA bathroom’s plumbing system supplies hard water.
It contains different compounds and mineral elements, which cause the deposits around the seal and flapper.
The higher pH causes the hard water residues to stick inside the components, and they can wrap, crumble, or crack over time.
You can install a water softening system in the bathroom to prevent problems due to mineral buildup.
Bacteria growth
Bacteria grow in a moist environment, and the water is always inside the toilet tank, which causes bacteria inside the fixture.
In addition, the algae and rotifer species inside the water tank affect its durability and cause the malfunction of the components.
Bacteria growth around the tank components causes them to deteriorate over time, and you may need to replace them more often if you do not clean the plumbing fixture after a few days.
Constant water running
You should replace it when the water constantly runs inside the bowl, and you notice a trickling water sound from the plumbing fixture.
This causes a lot of water wastage and an increase in the water bills if you do not fix the problem soon.
In addition, the flapper can get lost because of excessive flushing if you have a single bathroom in the house and all family members are using it, which causes the water to drip.
Harsh cleaner in the tank
The harsh cleaners can remove the rust and mineral deposits and also causes the tank components to degrade.
It is made using rubber or plastic, which can get damaged because of the toxic chemicals in the cleaners.
Bleach chlorine cleaners deteriorate the component, and the cleaning tablets get stuck in the flush valve tube, which affects its performance.
Low flushing water
The water pressure to flush the waste into the drains becomes low when the fixture is not working correctly and water is not coming with pressure.
This can cause many problems, such as the waste products may remain standing in the toilet bowl, and low water pressure cannot draw the waste into the sewage.
The drain pipes can get clogged because of low flushing and cause flooding in the toilet, which is a horrible thing to experience.
How long does the flapper in the toilet tank last?
Toilet tank flapper can last for 5-6 years, depending on the material quality. You should also check its size because it can damage soon if you place a loose part on the flush valve tube.
It fails to create a tight seal around the valve, and this causes the dripping and trickling of water in the bowl.
In addition, the flushing is low, which is a sign that the component is worn-out and you need to change it.
You can make it last longer by regularly checking around the seal and cleaning the bacteria and mold on its surface.
There are a lot of flapper designs, such as some with chains and some without chains.
It is better to select the chain component because it can make the flushing lever and the flush valve tube connection more secure and feasible.
You can check the chain length because a tight or loose chain affects its durability, as it is difficult for the flush valve tube to open when the chain is too tight.
Related Articles: