No More Nails is a versatile adhesive that reduces the need for screws and nails to stick the tiles on the floor and bathroom walls. It is used for various purposes and has become famous recently for DIY projects without using nails on the walls and floor.
Can You Use No More Nails on Bathroom Tiles? You can use No More Nails on the bathroom tiles for small areas or to attach and repair the worn-out tiles on the floor or walls. It is easy to stick the tiles on the floor, uses a waterproof formulation, and is safe and convenient to apply. It can prevent mold and fungus, avoid damage to the surface, and provide better adhesive strength.
It is suitable for small projects, such as replacing some floor portions, attaching loose tiles, and fixing gaps or misaligned floor planks. However, using it for large bathroom projects can cause them to lose adhesion over time because it can hold on to small areas and detach on larger areas.
Why would you use No More Nails on the bathroom tiles?
You can use these because of the various benefits, and some of the reasons for using these are explained here.
Easy to stick the tiles on walls and floor
The specially formulated No More Nails adhesive has great strength to hold the tiles, and you can use it for small renovations in this place.
You can use it to cover the cracks, and easy to apply, as you can do the minor repairs yourself in the bathroom. In addition, it can firmly grab the tiles on the floor and walls, and you do not need to call a professional for small projects in this place.
The extra adhesive capacity makes it ideal for DIY projects, and it can hold large weights with great strength. For example, I have used it to replace the worn-out tiles on the bathroom floor, which works well to keep the tiles in their place.
Waterproof
No More Nails can resist moisture, humidity, heat, and water, and it is ideal to use on the shower floor to fix the loose surface.
The product uses a waterproof formulation, and you can clean or wash the floor to remove the excess glue from the surface when it dries.
The adhesive can create a water-resistant bond between the tiles and the floor and make the flooring more durable. It can work excellently well on wood surfaces and prevent water splashes into the surface that can loosen the planks.
Prevent mold and fungus
This product can prevent mold and fungus accumulation inside and around the bathroom tiles because of the moisture and humidity in this place.
It can fill the gaps, and there is no space left between the tiles for mold growth because of the moisture resistance.
The fungus can grow in the seams due to the humidity present, but this adhesive does not allow them to penetrate through the gaps.
Safe and convenient to use
It is a solvent-free adhesive that is safe and easy to use, as you do not need to drill holes and screw nails to fix the tiles.
The risk of getting hurt from the nails reduces if they extend out of the surface and you are walking naked foot on the floor.
It is convenient to use, as you do not need to mix different products to form the adhesive and then apply it to the floor. You can easily squeeze the tube and apply it to the desired portion without much effort and hard work.
Better adhesive strength
No More Nails have high adhesive strength and are widely used in construction sites and small building renovations. In addition, it has excellent capability to seal the gaps and hold them in their place for a long time.
Different nail liquids are used for this purpose, and the strength and ability to adhere to the planks on the surface depend on the quality and formulation.
It is an ideal option for the surface with mirror back texture and is made using synthetic rubber adhesives with great flexibility.
I have applied this adhesive on my bathroom floor, and it fits perfectly without any wobbling or misalignment.
Avoid damage to the floor and walls
Since we do not use any nails and screws to fit the tiles on the surface, the chances of damage to the floor decrease.
The surface material, such as stone and ceramic, can get cracks when you drill the nails to fix them on the surface.
This can affect the overall appearance, and you may have to change them to refresh the look.
The appearance will enhance if you avoid using the nails on the wall tiles because they retain the hole if you redecorate the place.
How to use No More Nails on the bathroom tiles?
The procedure for No More Nails to use on the tiles is simple and easy, and you can do the minor repair yourself.
Ensure that the backside of the tiles and the floor surface is clean and that no grease and dust layers are on them. I sanded the side facing the floor using abrasive paper and use a towel or cloth to clean the dirt properly.
I prefer to remove the paint flakes and silicone caulk used in grouting from the surface to fix them correctly on the floor.
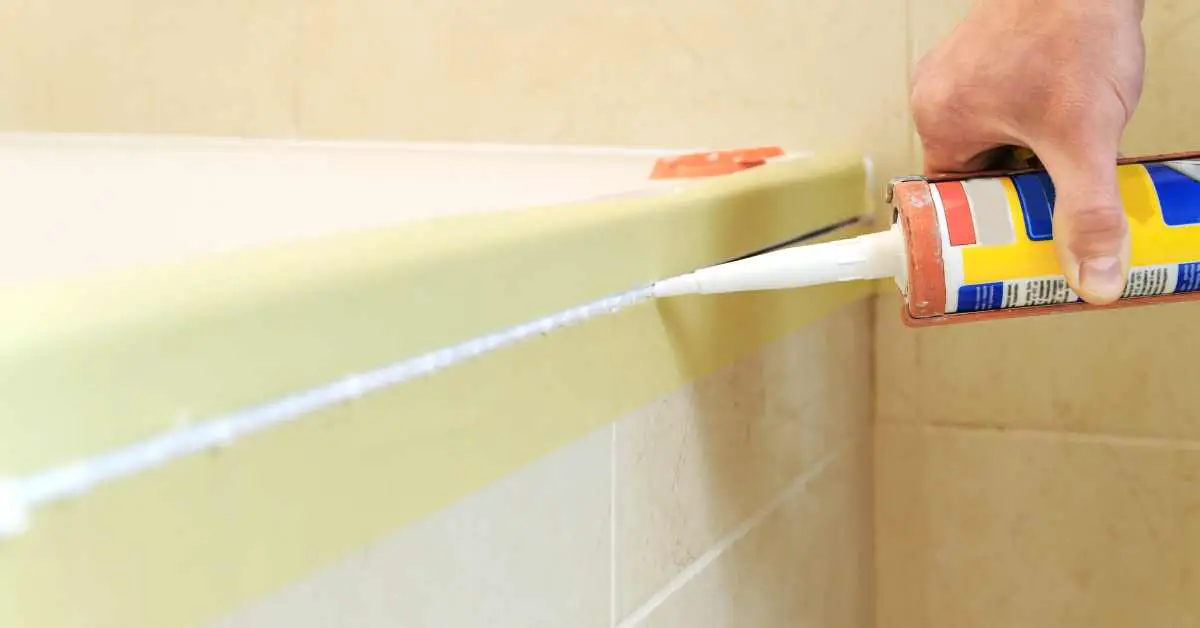
You can select this product with a cartridge to apply it on the edges and its center. Then, press it firmly and move it back and forth to spread the liquid paste on all sides.
Removing the excess adhesive from walls is better because it becomes difficult to wipe it when it dries.
You can pull off the tile from its place and let the adhesive set for 2-3 minutes to fix it more firmly on the floor or wall and then put it back by pressing it tightly.
Repeat the process for all the tiles, and I recommend applying an adequate amount of adhesive to avoid cleaning problems later.
I have used this procedure on a small portion of my bathroom to replace the old tiles and have successfully done this task without damaging their surface.
Things to consider when using No More Nails in the bathroom
There are various types of liquid adhesives manufactured by different brands and companies, and you can select them depending on the project and location to apply them.
Ensure that the adhesive you selected is specially formulated for the tiles because the wrong selection can cause wobbling and damage to the planks.
Carefully read the packing description before applying it on the surface; it is better to know about the nature of the material.
This adhesive can work on ceramics, wood, metal, stone, and vinyl materials and is not successful on Teflon, Polypropylene, and Polyethylene.
It takes 25-50 hours to dry completely and can peel off if you do not allow enough time to cure the adhesive. The curing period also depends on the weather, ventilation, and temperature in this place.
I clean the surface properly to remove the grease, oil, and dust because a dirty surface causes the adhesive to lose its strength and not fit well on the floor.
Do not use the strips and rolls to fix the tiles on the walls because they are not suitable for attaching the tiles. However, you can use them for attaching the light fixtures and mirrors to the walls.
You may think of applying an excessive amount of adhesive to add more strength to the surface, but it can cause an uneven surface. Therefore, applying a thin layer of it is better to retain the smooth look and easy clean.
Related Articles: